 |
Projects
|
Projects Welcome To KenSeibert.Com Audio
Let's take a look at the schematic as a whole, then discuss each of the parts. You can click on the schematic to see a larger version instead of squinting at the tiny one below.
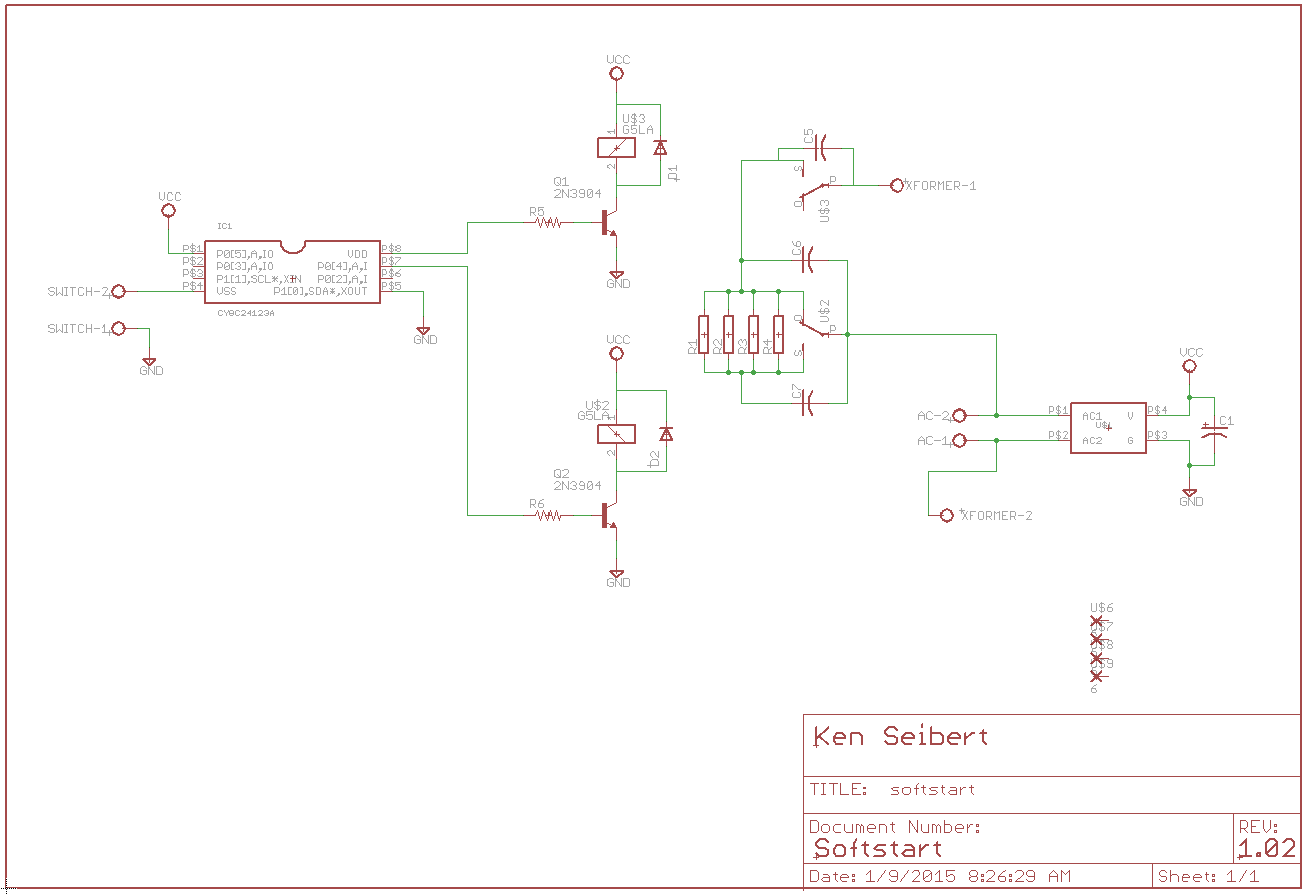
On the left of the schematic is the heart of the circuit - a microcontroller. There are a multitude of ways that this function could be implemented, but we chose a microcontroller because many functions can be realized in the one piece of hardware:
- Switch Function - We want to be able to handle nearly any type of switch for this device. By using the microcontroller to read the status of the switch, we can determine if the switch being used is a momentary switch or an OFF-ON switch. With the momentary, there is a relatively short time when the switch is active. With the OFF-ON, the active time is typically much longer. We can then programmatically determine which type is being used and the proper state of the device. Since this also represents a logic input, a CPU or remote control signal can be routed to the switch input instead of an actual switch.
- Timer Functions - The main purpose of the device is to current limit the AC for a short time while the capacitor bank charges. The microcontroller can very accurately set this soft start time.
The microprocessor chosen is the Cypress CY8C24123A. It is small (8 pin DIP), inexpensive (under $3), and requires no external crystal or components.
The two outputs of the microcontroller drive transistors which in turn drive relays. One relay routes the AC through current limiting resistors. The other relay routes the AC directly to the transformer. In normal operation, the device is waiting for the switch with both relays off. When a switch ON is detected, the current limit relay is turned on. After a short time delay (a few AC cycles), the direct relay is turned on and then the current limit relay is turned off. When the OFF action of the switch is detected, the direct relay is turned off.
Flyback diodes are placed across the relay coils to shunt flyback current spikes. AC line capacitors are placed across the relay contacts to reduce EMI from contact bounce.
The microcontroller does require 5V power to continually monitor for switch events and drive the transistors. Only a very small amount of power is required (under 20mA), so we selected an integrated and encapsulated 5V supply that runs from the AC line.

If you are interested in using these boards to make your own SoftStart, they can be purchased from the Store.