 |
Projects
|
Projects Welcome To KenSeibert.Com Audio
Many DIY electronics builders have avoided working with surface mount devices (SMD) as they have felt that working with these tiny devices was too difficult. So many of the best parts are now only available as SMD. There are a few tips and tricks for working with these parts that when followed can let the home builder turn out some very professional results.
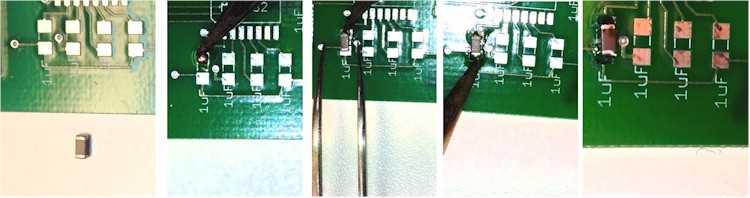
Soldering these parts by hand, using a fine tip soldering iron is possible for all but the smallest pitch parts, but the results are not as pretty or consistent as using an oven. To begin, be sure to use a fine tip soldering iron, preferable a temperature controlled one. Use no more than 660 deg F as the tip temperature. For 2 lead parts (resistors, capacitors, etc), heat one pad and apply a small dab of solder. Using small-nose pliers or tweezers position the part on the pad while heating the solder with the iron. When that pad has cooled and the part is now secure, solder the other pad. With practice, consistent solder flows can be obtained for reasonable joints.
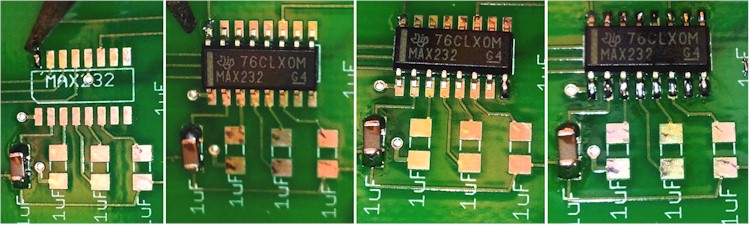
For IC packages, start by applying solder to one pad. Position the IC, being careful to keep all the pins aligned to the pads, then press down on the IC while heating the pad with the solder. Once this pin has been secured, do the same to the pin on the opposite corner, then follow with the rest of the pins. This method will work with ICs that have 0.100” pin pitch, and even those with 0.050” pitch. For smaller pitch, or parts that have the pads on the bottom of the IC, this is not recommended.
For better and more consistent results, using an oven is recommended. The best type to use is a countertop toaster oven. Inexpensive, low powered ones are the best. Avoid the expensive, high powered ones, they heat up too fast and have too many features that will get in the way. At Walmart or Target, budget $25 or so – much less than a good soldering iron! An inexpensive oven will heat up more slowly and give the proper thermal profile for doing SMD soldering.
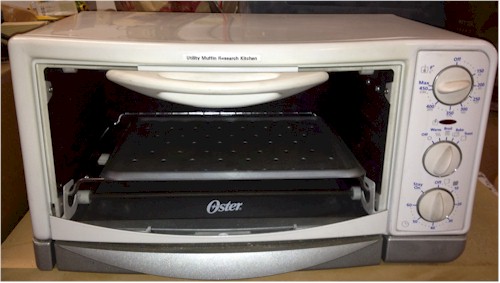
Please, DO NOT use the toaster oven in your kitchen. Your spouse will not be amused and once the oven is used for soldering, it will no longer be fit for food preparation. You will want to use this in a well-ventilated, well-lit location. When you heat up solder paste, the fumes can concentrate and make you dizzy – take my word on this!
Solder paste is available in many grades and styles. Look for one that is water washable. This will allow you to clean off the residue easily. It typically comes in small amounts in syringes. It is best to refrigerate the paste, this makes it last longer. The paste comes with a limited shelf life – 6 months or so, but I have successfully used paste that is a few years beyond the stated shelf life.
There are two methods of applying solder paste to the board. If you are doing one or two boards, applying paste by hand is a reasonable approach. For larger numbers of boards, purchasing a stencil is by far the preferred method.
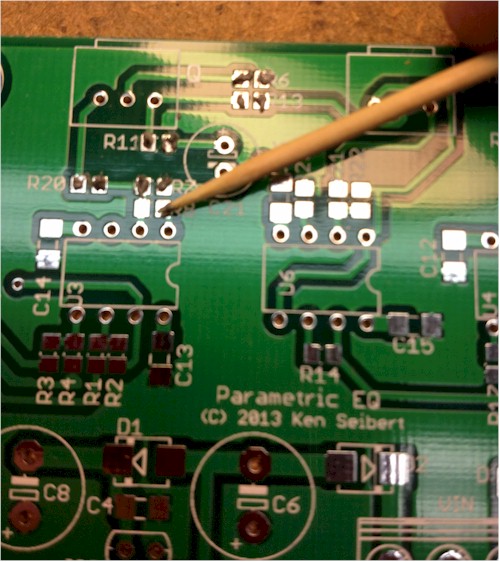
To apply paste by hand, use a toothpick to apply a dot of solder paste to each pad. You do not need or want to cover the entire pad with paste, just enough so that the component will have a sufficient amount to adhere to the board. If in doubt, use slightly less than you would think is necessary.
To use a stencil, first you must have a stencil made. Many board manufacturers also produce stencils. You will need a gerber file of the board that includes the dimension layer and the tCream layer. This is then sent to the manufacturer who will provide a stainless steel stencil which has cutouts for each solder pad.
Align the stencil over the board then apply a bead of solder paste at one end. Use the provided piece of stainless to wipe the solder across the board. Paste will be applied to the board in an even layer over the entire pad in the thickness of the stencil. Carefully remove the stencil and you will have a board with the solder paste applied.
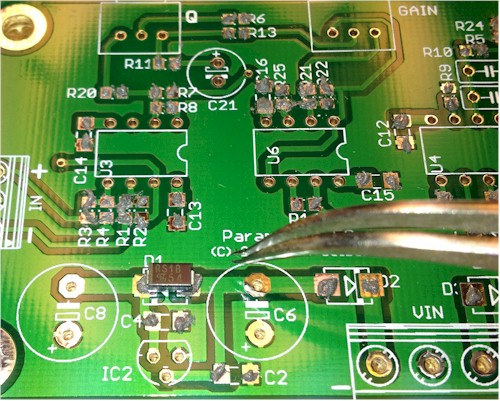
To place the parts, it is very helpful to have an illuminated magnifying glass and a good set of tweezers. Some of the parts are small, and almost impossible to pick up using your fingers. Even if you were able to pick up the part with your fingers, you would most likely smear the paste on adjacent pads when placing the part. Try to align the parts carefully. Where you place the parts is where they will end up, except in two cases:
If you put too much solder on the pad, the part may float up, then float off of the pad during solder flow. In the case of an IC, the surface tension of the solder will help to align the part to the pads even if the part is slightly mis-aligned. If there is too much solder, however, the part may self-align to adjacent pads, a difficult repair.
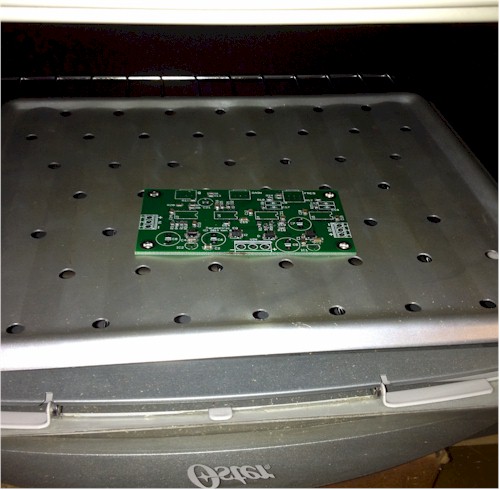
Once the parts have all been placed on the board, it is time to bake the boards.
Start with a cold oven. Place the board in the center of the oven and close the door. Set the controls to “Bake” and “Always On” if you have those settings. We want to use manual timing and not use the self-timer functions on the oven. Set the temperature control to 200 deg F then turn on the oven. We want to bake at 200 deg for 4 minutes. This will help equalize all of the parts and the board to a low working temperature. Going to this low temperatire will prevent a large shock to the parts and keep parts from breaking due to the shock.
After the 4 minute soak, increase the temperature to 325 deg F. We will leave the temperature setting here for 2 additonal minutes. This next temperature level will allow any moisture to evaporate and let all the parts get to a steady state that is below the melting point of the solder.
At the end of this 2 minute soak, increase the temperature one last time to 450 deg F. This is higher than the melting point of solder. Watch the board closely. After about a minute, you should see the paste start to melt and turn shiny. Keep the oven on for 30 seconds after all the solder has melted. Then turn opff the oven and open the oven door. Opening the door will shake the board slightly. This will help the ICs to settle into position. Leave the door open until the board cools enough to touch, which is usually about 15 minutes. Do not rush this portion - the solder may still be partially pliable and parts could be shocked loose.
After cooling, inspect the board to solder balls and bridges, and check to see if any parts have floated away from the pads. This can usually be fixed with a fine-tip iron. Solder bridges can be removed with a piece of solder wick.
If you make an error on the timing of the process, allow a longer soak at 200 deg and 325 deg rather than shortening these times. Time the final 30 seconds closely. Too long at 450 deg can damage the parts.